Domain RegistrationFind the perfect domain for your business or personal site with ease.
 Web HostingAffordable Canadian web hosting, user-friendly and reliable.
 WordPress HostingFast, reliable WordPress hosting in Canada. Perfect for blogs and businesses.
 Email HostingCreate branded email accounts with simple, affordable email hosting.
 Reseller HostingStart your own hosting business with flexible reseller hosting plans.
 Affiliate ProgramJoin our affiliate program and earn commissions by referring customers.
 Windows HostingFast, reliable hosting for your Windows-based sites and applications.
 Cpanel HostingHosting made simple with the user-friendly cPanel dashboard
 WHOIS LookupQuickly find who owns a domain with our easy WHOIS search tool.
 All TLDsSecure the domain you want. Explore Canadian and global extension options.
 .com DomainSecure a globally trusted domain and start building credibility from the very first day.
 VPS HostingReliable VPS hosting crafted for performance and peace of mind.
 Managed VPSNo technical skills? Let us manage your VPS for you.
 Dedicated ServersTake full ownership and control of your private dedicated server.
Last updated on March 19th, 2025 at 12:10 pm
CyberPanel is an open source web hosting control panel that allows managing web sites, domains, databases, email accounts and more through a user friendly interface.
Some key benefits of using CyberPanel include:
- Easy to use interface for managing web hosting
- Support for multiple web sites and domains
- Email accounts, mailing lists, spam filtering
- Database management (MySQL, PostgreSQL)
- Application installer for common apps like WordPress
- Security tools like firewall configuration
- Optimized for low resource usage
Using CyberPanel to manage web sites on a VPS can save time and effort compared to manually configuring all services.
It brings a shared hosting like experience to your own virtual private server.
Choosing a VPS for CyberPanel in Canada
Selecting the right VPS (Virtual Private Server) is important for having a smooth experience running CyberPanel.
You want enough resources to handle your expected sites and traffic levels, while keeping costs reasonable. This section covers guidelines for choosing your hosting VPS in Canada.
VPS Sizing Considerations
The cores, memory and storage of your VPS determines how many sites and monthly visitors it can comfortably accommodate. Some rough guidelines:
Light Usage VPS
- 1-5 sites
- Under 5000 visits / month total
- Recommended VPS:
- 2 CPU cores
- 2GB RAM
- 40GB SSD storage
Medium Usage VPS
- Up to 50 sites
- Up to 50,000 visits / month total
- Recommended VPS:
- 4 CPU cores
- 4GB RAM
- 80GB SSD storage
High Usage VPS
- Around 200 sites
- Up to 500,000 visits / month total
- Recommended VPS:
- 8+ CPU cores
- 16GB+ RAM
- 200GB+ SSD storage
CyberPanel Resource Usage
Keep in mind CyberPanel itself has a very low footprint, utilizing:
- 128MB – 256MB RAM
- 2-4% CPU
So the large majority of your VPS resources are available for your web hosting workload.
Linux Distribution Options
CyberPanel supports multiple Linux distributions, but CentOS 7 is recommended as the most stable and compatible choice:
CentOS 7
- Considered best for stability and performance
- Longer term support until 2024
- Large software ecosystem and community
Debian 9/10
- More bleeding edge packages
- Shorter LTS support cycles
- Not quite as compatible out of the box
Ubuntu 18.04
- Based on Debian so similar tradeoffs
- Works well but has higher resource usage than CentOS
Unless you have a specific need for Ubuntu or Debian, CentOS 7 is encourages as the distro that will lead to least headaches long term.
VPS Hosting Providers in Canada
You have many good options for Linux VPS hosting compatible with CyberPanel. Here are top recommendations:
Cloudpap
Deploy your CloudPAP compute instances in seconds.
Run any workload, from mission-critical CPU, memory, and storage-intensive apps to low-traffic sites.
DigitalOcean
- Simple interface and predictable pricing
- Offer higher spec’d instances
- Global data center locations
- Fast storage and networking
Vultr
- Very cost competitive pricing
- Usage-based variable billing
- Bare metal instances available
- Deploy to 15+ global data centers
Linode
- Around since 2003, very well known
- Emphasis on stability and uptime
- Solid network connectivity
- Reasonable prices
All three providers make launching and managing CentOS 7 VPS servers easy which is what matters most for getting started with CyberPanel.
Launching your CyberPanel VPS
Once you’ve chosen your desired provider, launching a fresh VPS prepped for CyberPanel only takes a few minutes.
Basic steps with most any provider:
- Sign up for account
- Access cloud server dashboard
- Click deploy new server
- Select region to host in
- Choose CentOS 7 for OS
- Pick VPS size based on guidelines above
- Give root password
- Wait 2-3 minutes for VPS deployment
- SSH in to newly created IP address as root
Your fresh CentOS 7 VPS instance will now be ready for Installing LEMP and CyberPanel.
Resizing VPS Plans
One advantage of choosing a good VPS provider is the ability to upgrade to a higher grade VPS plan later very easily, often with no downtime.
If after using CyberPanel for awhile you need more cores, RAM, bandwidth or storage, just:
- Login to hosting provider portal
- Navigate to upgrade plans section
- Select a plan with more resources
- The provider handles migrating your VPS to new hardware
So don’t worry about perfectly predicting your hosting needs upfront.
Key Considerations Summary
- Size VPS based on expected sites and monthly traffic
- Use CentOS 7 64-bit for best stability
- Choose hosting provider with simple dashboard and upgrade process
- Launch basic CentOS 7 image
- Adjust resources later if necessary
This will provide an ideal foundation for installing CyberPanel and having a great hosting control panel experience even as future needs change.
A provider that allows resizing resources later is ideal in case you need to scale up.
Installing LEMP Stack on VPS
Before installing CyberPanel, you need a LEMP stack installed:
- Linux – Operating system
- ENginx – Web server
- MySQL – Database management
- PHP – Programming language
Here is an overview of getting LEMP deployed on CentOS 7:
- Launch a CentOS 7 VPS instance with your hosting provider
- Log into the VPS as root via SSH
- Update system packages:
yum update -y - Install EPEL repository (Extra Packages for Enterprise Linux):
yum install epel-release - Install Nginx web server:
yum install nginx - Start Nginx:
systemctl start nginx - Confirm Nginx is running by visiting VPS IP in browser
- Install MySQL database:
yum install mysql-serverSecure the installation:mysql_secure_installation - Install PHP
yum install php php-mysqlnd php-fpm php-json - Enable and start PHP-FPM service
systemctl enable php-fpm systemctl start php-fpm
Once you have a LEMP stack running, you are ready to install CyberPanel.
4. Downloading and Configuring CyberPanel
With the LEMP stack online, follow these steps to get CyberPanel installed:
- Download CyberPanel installer:
wget https://cyberpanel.sh/install.py - Edit the config file:
python install.pyChoose option #2 for manual configuration - Update paths to point at your Nginx, PHP-FPM and MySQL locations
- Start installation script:
python install.py - Choose full installation option
This will complete the installation process automatically. It takes 5-15 minutes usually.
Some key configuration areas set by the installer:
- Creates CyberPanel system user
- Configures cPanel like directories
- Sets up database for CyberPanel
- Creates virtual hosts for domains
- Enables and configures LiteSpeed web server
- Configures everything to work with LEMP stack
After finishing, CyberPanel should be installed and ready for setup!
Initial CyberPanel Setup
Once CyberPanel is installed, there are some key configuration steps to take before starting to create accounts and add domains.
Taking the time to complete these correctly will ensure your experience with CyberPanel is smooth.
Create the Admin Account
The first step is to create your main CyberPanel administrator account.
- After installation finishes, the script will provide a URL to visit to set the admin username and password. Example:
Please go to the following URL and create the admin account: http://123.123.123.123:8090 - Navigate to that URL in your browser. You will see a screen prompting to set your admin username and password:
- Enter your desired admin username and a strong password. This account will have full control over the entire CyberPanel system.
Once submitted, you will be logged into the CyberPanel dashboard automatically.
This admin account can be used to create other users with different privilege levels later.
Adjust File Permissions
By default, CyberPanel uses very strict file permissions for security reasons.
However, this can prevent normal operation of some functionality.
To allow accounts and services to operate properly, you need to relax permissions on a few directories:
chmod -R 755 /home
chmod -R 755 /etc/cyberpanel
The /home directory is used for user accounts and websites files. The /etc/cyberpanel directory contains CyberPanel specific configuration.
Configure Mail Services
The final step is enabling mail services so accounts can send/receive email.
By default CyberPanel uses Postfix for mailing, but you can switch to Sendmail or setup a full mail stack instead.
- From main dashboard navigate to: Email –> Mail Server Settings
- Configure desired mail server: As you can see there are sections for Postfix, Sendmail and External Mail Service settings.
- Enter your preferences to match your mail stack requirements.
Once mail services are properly configured, user accounts and sites created in CyberPanel will be able to send/receive emails normally.
Taking the time to complete these three steps sets you up nicely to start fully leveraging the power of CyberPanel for your web hosting management needs!
After those steps CyberPanel should be ready for general usage!
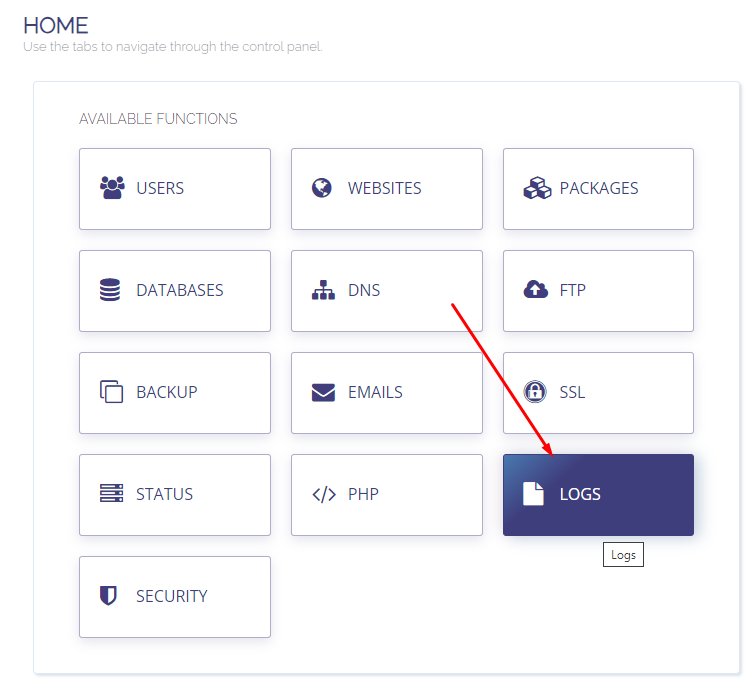
6. Managing CyberPanel
Once logged into the admin dashboard, CyberPanel offers the following core features:
Control Panel
This is where domains, websites, databases and more are managed:
- Domains – Add/remove domains
- Website – Create sites for domains
- Package – Set resource limits per site
- Databases – Add/manage MySQL/Postgres DBs
- DNS – Manage DNS zones
- Services – tools like mail and FTP accounts
Account Panel
For managing users accounts:
- Create/remove user accounts
- Set packages to allocate resources
- View usage statistics
Server Settings
Includes server management tools like:
- Security options – Firewall, kernel settings, etc
- Admin privileges – granting server or reseller access
- Performance – tune database and web server settings
- View traffic and usage
With these you can fully manage your web hosting environment with CyberPanel as the central interface.
Read also: Best Canadian VPS Providers (Compared)
Scaling and Optimizing CyberPanel on a VPS
As your web hosting usage grows from a few sites to dozens or hundreds of sites, CyberPanel and the underlying VPS will need some tuning to handle the increased loads.
Here are tips for making sure performance remains smooth.
Monitoring Resource Usage
The first step is keeping a close eye on server resource utilization using CyberPanel’s built-in usage graphs:
Dashboard –> System Logs –> Resource Usage
This shows historical data for:
- CPU Load – Overall CPU usage percentage
- RAM Usage – System memory consumption
- Disk Usage – Storage space used
If CPU, RAM or disk space remain very high (85%+) consistently, it means your VPS is underpowered for the workload. Time to upgrade.
Acceptable Ranges:
| Resource | Normal Load |
|---|---|
| CPU | Under 60% during peak times |
| RAM | Under 75% during peak times |
| Disk | Under 80% overall |
Upgrading the VPS
If your VPS plan is too undersized, the solution is moving to a higher spec plan with more CPU cores, RAM and SSD storage space.
Most VPS providers make this easy to do with little to no downtime for your sites. Steps may vary by provider but generally:
- Log into VPS provider control panel
- Navigate to VPS upgrade page
- Choose new VPS plan (more CPU/RAM)
- The provider handles moving and resizing everything automatically
After a few minutes your CyberPanel instance will be running on new improved hosting resources!
Popular VPS Upgrade Paths
| Starting Plan | Upgrade Plan |
|---|---|
| 2 CPU Core, 4GB RAM | 4 CPU Cores, 8GB RAM |
| 4 CPU Core, 8GB RAM | 6 CPU Cores, 16GB RAM |
CyberPanel Performance Tuning
In addition to scaling up the VPS, you can also tune CyberPanel itself to handle more usage:
Tune LiteSpeed Settings
CyberPanel uses LiteSpeed as the web server by default. Optimization can help:
[Max Connections]
Increase from default of 1024 to 2048+

[Max SSL Connections]
Boost to match Max Connections

[PHP Children]
Set based on number of sites/traffic
Adjust PHP-FPM Configuration
Edit CyberPanel’s /etc/cyberpanel/phpfpm.conf file:
[PHP Options]

pm.max_children = 100

pm.start_servers = 30

pm.min_spare_servers = 20

pm.max_spare_servers = 50
MySQL Tuning
If hosting large DBs, consider tweaking my.cnf settings:
key_buffer_size
innodb_buffer_pool_size
query_cache_size
thread_cache_size
This will help CyberPanel handle much more traffic and usage!
Summary
- Monitor usage charts for high utilization
- Scale VPS plan for more resources
- Tune LiteSpeed, PHP and MySQL configs in CyberPanel
With some smart optimization, CyberPanel can easily power heavy hosting workloads on a properly specc’d VPS!
This will help ensure CyberPanel remains performant as usage scales up.
Key Takeaways
CyberPanel brings an intuitive hosting panel to your VPS in Canada.
Some of the key benefits of installing CyberPanel on a VPS:
- Creates a user friendly hosting management environment
- Makes managing multiple sites, domains, servers much easier
- Includes security and performance tools
- Scales well with higher-end VPS plans
- Supports web developer favorite LEMP stack
Overall CyberPanel can make running a custom web hosting environment easy for both users and administrators.
Read also: